MCP Control
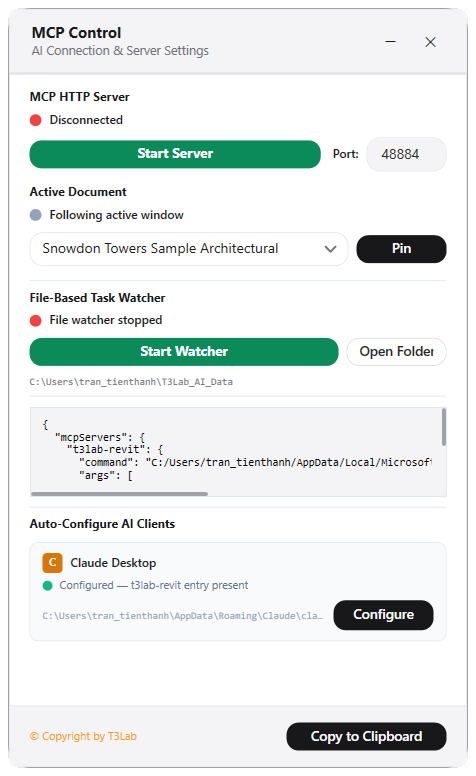
MCP ServerBảng điều khiển máy chủ Model Context Protocol (MCP) cục bộ. Quản lý trạng thái kết nối, cấu hình cổng mạng đa cửa sổ Revit (dải 48884-48894), tự động tạo token bảo mật và ghi nhận dữ liệu giảng dạy AI (Teaching Mode).
Quick Workflow
Mở MCP Control từ stack Assistant Tools trên ribbon Support.
Xem trạng thái máy chủ (Running/Stopped), cổng kết nối đang gán và số lượng tool khả dụng.
Bật/tắt chế độ tự khởi động Auto-start MCP server khi mở Revit.
Kích hoạt chế độ Teaching Mode để thu thập các ví dụ mẫu huấn luyện AI riêng cho doanh nghiệp.
Interface Preview
Detailed Documentation
MCP Control - User Guide & MCP Tool Catalog
The MCP Control utility provides a secure local gateway using the Model Context Protocol (MCP) developed by Anthropic. This protocol allows advanced desktop AI models (such as Claude Desktop, Cursor, Gemini CLI, Cline, Roo Code, etc.) to directly communicate and interact in real-time with Autodesk Revit running on your local machine.
1. Overview & Architecture
When you run MCP Control from the Revit Ribbon:
- A Local HTTP/SSE Server starts on port
48884(or subsequent ports like48885,48886if the default port is already occupied). - Security & Authorization: On startup, a random security token (hex string) is generated and saved locally to
%APPDATA%\T3LabAI\mcp_token.txt. Every request made from external AI clients must carry this token in theAuthorization: Bearer <token>header. This prevents unauthorized processes or network requests from executing code inside your Revit session. - Document Pinning: Allows you to lock AI tool execution onto a specific Revit project document, even if you switch active tabs or work with multiple open documents concurrently.
2. Installation & Setup Guide
Below is a flowchart summarizing the setup process for the MCP Control environment:
┌─────────────────────────────────┐
│ 1. Install Python               │ <── From Microsoft Store (Auto-registers PATH)
└────────────────┬────────────────┘
                 │
                 ▼
┌─────────────────────────────────┐
│ 2. Install Claude Desktop       │ <── SECURITY NOTE: DO NOT run as Administrator
└────────────────┬────────────────┘
                 │
                 ▼
┌─────────────────────────────────┐
│ 3. Install pyRevit Extension    │ <── Installs the T3Lab Revit ribbon toolset
└────────────────┬────────────────┘
                 │
                 ▼
┌─────────────────────────────────┐
│ 4. Open MCP Control in Revit    │ <── Open Revit -> Go to T3Lab tab -> Click MCP Control
└────────────────┬────────────────┘
                 │
                 ▼
┌─────────────────────────────────┐
│ 5. Start Server & Watcher       │ <── Click "Start Server" and "Start Watcher"
└────────────────┬────────────────┘
                 │
                 ▼
┌─────────────────────────────────┐
│ 6. Configure Claude Desktop     │ <── Click "Configure" to auto-write config JSON
└─────────────────────────────────┘
Detailed Setup Steps:
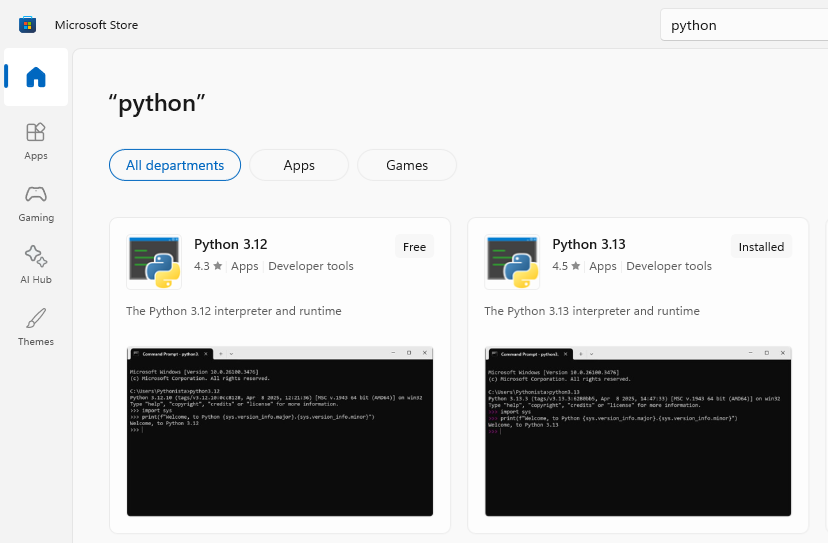
Step 1: Install Python from Microsoft Store
- Open the Microsoft Store app on Windows.
- Search for "Python".
- Select Python 3.12 or Python 3.13 and click Get / Install to download and install.
- Benefit: Installing Python from the Microsoft Store automatically registers the Python executable path to the Windows Environment Variables (
PATH). No manual configuration is required.
Step 2: Install Claude Desktop (⚠️ Important Security Note)
- Visit the official Anthropic website and download the installer for Claude Desktop.
- When launching the installer (
ClaudeSetup.exe), DO NOT run it as an Administrator. Install it under standard user privileges. - ⚠️ SECURITY WARNING:
- If Claude Desktop is installed with Administrator rights, it will automatically install and enable Claude Co-worker (Claude Co-work).
- Claude Co-worker is an advanced AI agent feature that can control your mouse, keyboard, and access files to manipulate your computer directly. If not carefully monitored, this could present significant system security risks.
- Installing and running under standard user permissions guarantees that only the standard, secure Claude Desktop application is active.
Step 3: Install the pyRevit Extension
- Ensure that you have pyRevit installed on your machine.
- Install the T3Lab.Revit extension through pyRevit to integrate the Revit Ribbon tab containing the MCP Control and T3Lab Assistant tools.
Step 4: Launch and Configure via MCP Control Console
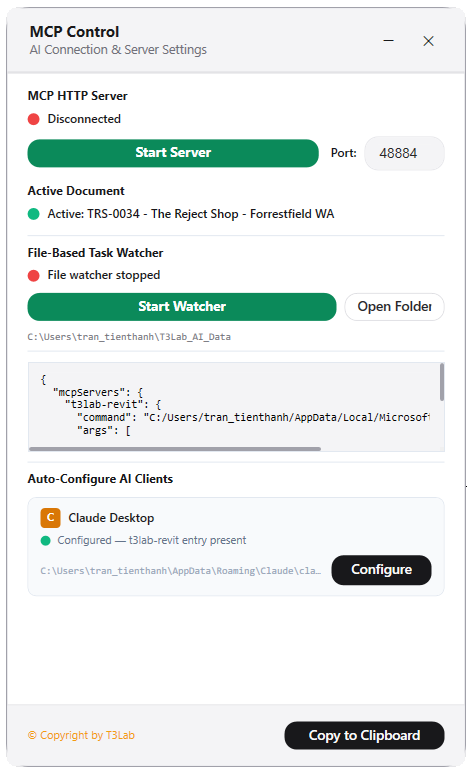
- Launch Autodesk Revit, go to the T3Lab tab on the Ribbon, and click MCP Control to open the management console.
- In the MCP Control panel, perform the following actions:
- Click Start Server: Starts the local server (default port
48884). The status indicator changes to green Connected. - Click Start Watcher: Starts the File-Based Task Watcher to listen to project file changes.
- Click Configure (under the Auto-Configure AI Clients -> Claude Desktop section): This button automatically overwrites/updates the active port and security bearer token details in your Claude Desktop configuration file (
claude_desktop_config.json).
- Click Start Server: Starts the local server (default port
- Restart Claude Desktop. Claude will now be connected directly to your Revit session via the local MCP server without needing any manual copy-paste operations.
3. Manual Connection Guide
A. Connecting with Claude Desktop
Open or create your Claude Desktop configuration file at:
%APPDATA%\Claude\claude_desktop_config.json
Add the t3lab-revit server config under mcpServers (you can copy the exact JSON snippet directly from the MCP Control console in Revit):
{
  "mcpServers": {
    "t3lab-revit": {
      "command": "python",
      "args": [
        "C:/Users/<YourUsername>/T3LabLite/lib/core/bridge.py",
        "48884"
      ]
    }
  }
}
Note: Make sure to replace <YourUsername> with your actual Windows username, and ensure the port matches the one displayed on the console.
B. Connecting with Cursor / VS Code (Cline / Roo Code)
- Configure an MCP server of type Command using the same command and arguments as above.
- Alternatively, connect via SSE protocol using the endpoint
http://localhost:48884/ssealong with the HTTP header:Authorization: Bearer <token_from_console>.
4. Supported MCP Tool Catalog
Here is the list of tools that an AI agent can invoke once connected to the Revit MCP Server, categorized by function:
Group 1: Model Query & Statistics
Tools designed to help the AI read the current state of the Revit model, query elements, or gather project data:
| Tool Name | Description | Key Parameters |
|---|---|---|
revit_get_active_view | Retrieves information about the currently active view (name, ID, scale, view template). | None |
revit_get_selected_elements | Retrieves details about elements currently selected by the user in Revit. | None |
revit_get_project_info | Retrieves general project parameters (Project Name, Number, Client, Address). | None |
revit_list_views / revit_list_sheets | Lists all views or sheets available in the current document. | view_type (Optional filter) |
revit_get_element_info | Retrieves detailed information, geometry, and coordinates of an element by its ID. | element_id (Required) |
get_all_parameters | Lists all parameters (name, value, type, read-only flag) for a given element. | element_id (Required) |
get_elements_by_level | Finds all elements of a specified category (e.g., Walls, Beams) on a given level. | level_name (Required), category |
get_current_view_elements | Retrieves elements currently visible in the active view, optionally filtered by category. | category, limit (Default: 100) |
get_material_quantities | Calculates material quantities (area/volume) for Walls, Floors, Roofs, or Ceilings. | category, level_name |
ai_element_filter | Performs search by filtering elements of a category where a parameter matches a value. | category (Required), parameter_name, parameter_value |
get_model_warnings / get_model_health | Retrieves active warnings, counts elements, and provides a health score of the model. | limit (For warnings) |
list_levels / list_worksets | Lists all levels with elevations, or user worksets with their open/close status. | None |
get_schedule_data | Reads a ViewSchedule and returns its data as a structured JSON table. | schedule_name or schedule_id |
Group 2: Creation & Modeling
Tools supporting the generation and placement of new Revit elements:
| Tool Name | Description | Key Parameters |
|---|---|---|
create_level | Creates a new level at a specific elevation. | elevation (m), name (Level name) |
create_grid | Generates a grid line system using a list of spacing intervals. | x_spacings (m), y_spacings (m), x_labels, y_labels |
place_wall | Places a straight wall between two coordinate points on a level. | start_x, start_y, end_x, end_y (m), level_name, height |
create_point_based_element | Places point-based elements (Doors, Windows, Furniture, Fixtures) at XYZ. | family_type, x, y, z (m), level_name, host_wall_id (For hosted items) |
create_line_based_element | Places line-based elements (Beams, Columns, Pipes, Ducts) between two points. | family_type, start_x, start_y, end_x, end_y (m), level_name |
create_surface_based_element | Creates a floor, ceiling, or roof from a closed boundary loop of XYZ points. | element_type ("floor"/"ceiling"/"roof"), boundary_points |
room_to_floor | Automatically generates a floor matching the boundary curves of one or more rooms. | room_ids (or room_id), floor_type |
create_room | Places a new Room element at a given XY location on a level. | x, y (m), level_name, name, number |
create_view | Generates a floor plan, ceiling plan, or 3D isometric view. | view_type, level_name, name |
create_sheet | Creates a new sheet with a title block family. | sheet_number, sheet_name, title_block |
create_text_note | Adds a text annotation to the active view at a specified location. | text, x, y (m), font_size |
create_dimension | Creates an aligned dimension line across a set of grid lines or references. | element_ids, offset |
create_workset | Creates a new workset in a workshared model. | name (Workset name) |
Group 3: Modification & Transforms
Tools used to modify element parameters, locations, and relationships:
| Tool Name | Description | Key Parameters |
|---|---|---|
set_parameter | Sets a single parameter value on a specific Revit element. | element_id, parameter_name, value |
bulk_set_parameter | Sets a parameter value across multiple elements of a category with optional filters. | parameter_name, value, category, filter_parameter, filter_value |
move_elements / copy_elements | Moves or copies elements by a translation delta vector. | element_ids, dx, dy, dz (m) |
rotate_element | Rotates elements around a vertical Z-axis through a given origin. | element_ids, angle_degrees, origin_x, origin_y |
split_curve | Splits a model or detail curve into multiple segments while preserving geometry. | element_id, segments, split_at_ratios |
split_element | Splits a wall, beam, pipe, or duct into two elements at a point or ratio. | element_id, at_ratio, x, y |
join_geometry | Joins or unjoins the intersecting geometry of two elements. | element_id_a, element_id_b, unjoin (Boolean) |
delete_element | Deletes elements. Supports dry_run=true to preview cascade deletions. | element_ids, dry_run |
rename_element | Renames a view, sheet, level, or other named Revit element. | element_id, new_name |
operate_element | Selects, hides, unhides, or isolates elements in the active view. | operation ("select"/"hide"/"isolate"/"unhide"), element_ids |
color_elements / revit_override_color | Color-codes elements by parameter values, or overrides element colors in a view. | category, parameter_name (Or color & element_ids) |
Group 4: Automation & Advanced Utilities
Tools for automation, batch publishing, and custom script execution:
| Tool Name | Description | Key Parameters |
|---|---|---|
send_code_to_revit | Executes custom IronPython 2.7 code directly in the Revit API context. | code (Python code string) |
apply_view_template | Applies a view template to one or more views. | view_ids, template_name |
place_views_on_sheets | Automates placing multiple views onto sheets as viewport elements. | view_ids, title_block, sheet_id (Optional) |
add_view_to_sheet | Places a view viewport onto an existing sheet at specified XY sheet coordinates. | sheet_id, view_id, x, y (in mm) |
export_sheets_pdf | Exports sheets to PDF files in a destination directory. | sheet_ids, output_folder, combined (Boolean) |
export_dwg / export_image | Exports sheets/views to DWG files, or saves views as high-resolution PNG images. | sheet_ids / view_id, output_folder, width |
purge_unused | Identifies and purges unused family symbols and view templates. | dry_run (Boolean report) |
say_hello | Opens a welcome dialog in Revit to verify that the MCP connection works. | message (Text content) |
show_assistant_pane | Shows or hides the built-in T3Lab Assistant dockable panel in Revit. | action ("show"/"hide"), message |
5. Key Notes & Best Practices
- Safety Transactions: All model write operations are managed via Revit API transactions. If any tool call encounters an error mid-execution, the entire operation is rolled back to protect the model's integrity.
- Python Execution Permissions: The
send_code_to_revittool gives the AI agent full access to the Revit API. While the server is secured locally using Bearer tokens, users should inspect script execution to ensure it does not enter infinite dialog loops which could freeze Revit. - Measurement Units: All modeling coordinate inputs (X, Y, Z, spacings, lengths) are standardized in meters (m). However, sheet coordinates and titleblock spacings in viewport placement tools (such as
add_view_to_sheet) are measured in millimeters (mm) to match paper size standards.